|
|
The
Purchase, Care and Feeding of a Home Wine Storage Unit -
Part
2
March
23, 2002 -
Hey,
What's That Noise?
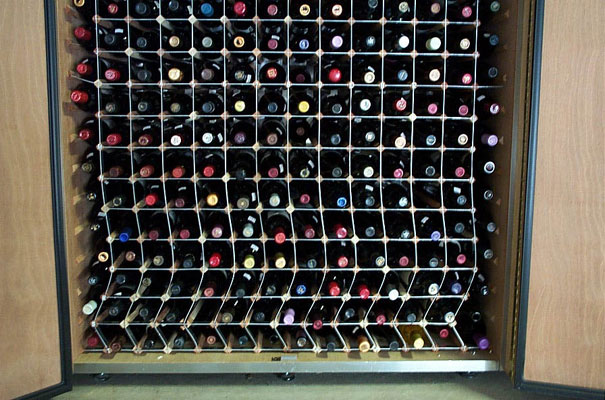
Things
had been going very good. My inventory was now up to 465 bottles,
still nowhere near the 560 rated capacity of the unit. This evening
I opened the doors and grabbed a couple of bottles for dinner.
While I was standing there for a moment admiring the symmetry
of the colored foil capsules, I started to hear a creak, then
a crack, and then a groan. Something was happening, and it sure
didn't seem like good thing.
|
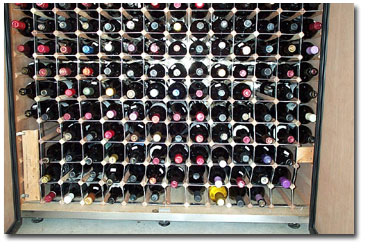
I
watched
in horror as the 2nd row from the bottom shifted to the
left, and the weight of the upper rows started to collapse
the three bottom rows into an accordion shape. I stood like
a deer in the headlights for a moment - wondering if bottles
on the bottom would start getting crushed. Then, full anxiety
hit. How was I going to get the impending sea of wine out
of my garage, I thought.
|
|
|
Then,
no more noises - nothing else moved. I reacted quickly.
I grabbed a small step stool and started to pull bottles
off the upper shelf. Then, I pulled out all of the bottles
from each of the rows, placing them at strategic positions
on the floor (don't forget, with an inventory-based on
location, I had to put them back into just the right slots
- that is, assuming I'd still have slots to put them into
when this is all over). Meanwhile, I was surveying the
damage as I went, trying to mentally concoct a fix - temporary
or otherwise - since I wasn't going to get a replacement
rack anytime soon.
One-hour
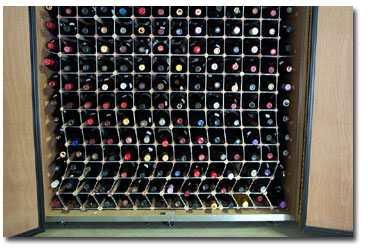
and 465 bottles later, I was able to assess the damage.
Diagnosis: despite the evenly distributed weight, the
stress on the aluminum uprights caused them to bend and
finally buckle, with the 2nd and 3rd rows shifting to
the left, and the 4th row listing to the right. This misalignment
caused several of the wood runners in the lower few rows
to split at the grooved points where the horizontal and
vertical aluminum struts intersect, allowing even further
movement.
|
|
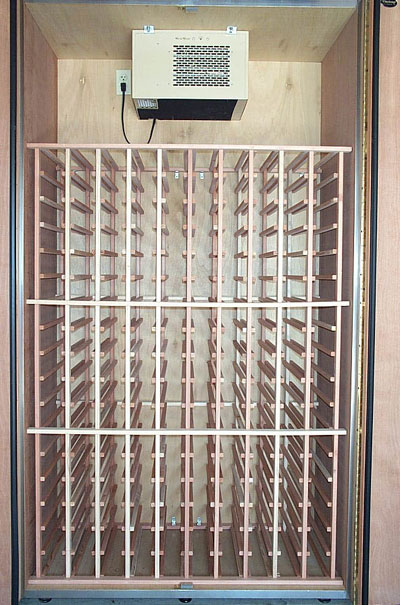
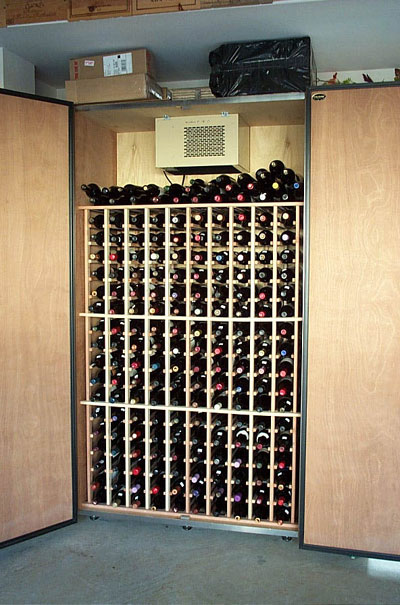
The
Design
(This
racking design places the unit in the center of the cabinet
from left-to-right, and attaches it to the back wall with
4 screws. At the front of the cabinet, 3 of the horizontal
aluminum crosspieces are elongated, and fit into slotted
pieces on the side walls, keeping the rack equally positioned
between the side walls. The rack itself has 12 bottle slots
horizontally, but uses its outside runners in conjunction
with rails mounted to the inside of the cabinet walls to
support an additional row of bottles on each side, for a
total of 14 bottles wide. While this certainly maximizes
the bottle capacity, iit also makes a maintaining a balanced
load very important.
Notice
that except for the 3 struts, the outer row on either side
does not have horizontal pieces of aluminum steadying or
supporting it. Therefore, in order to balance the
load, it's important to equalize the weight across the
rack. The downward pressure from the weight of the bottles
is therefore absorbed by the vertical struts, while the
3 horizontal struts maintain the vertical angle, and the
unit's integrity. Finally, there is a matrix of aluminum
struts framing the entire back of the rack. Although this
maintains rigidity in the back of the rack, it does nothing
for the front of the rack. Therefore, any collapse will
normally take place at the front of the unit, effectively
tipping everything forward.)
A
Temporary Fix
With
all of the bottles out of the rack, I tried to bend the
bottom rows back into shape. But, to no avail. There just
wasn't enough room to get the leverage needed to push or
pull the rows back into shape. So, I pulled out the 4 screws
that held the rack to the back of the cabinet, and snaked
the rack out so I could give it some first aid. Turning
it on its side, I succeeded in pushing the bent section
back a little more into its proper shape. It occured to
me at this point that it might be possible to turn the rack
upside-down when putting it back into the cabinet. I thought
maybe having the un-damaged section on the bottom would
give the unit greater strength. Unfortunately, this wouldn't
work, since the aluminum struts wouldn't match-up with the
grooved side rails on the cabinet walls.
|

|
|
|
After
bending the rows back into shape as much as I could, I put
the rack back into the cabinet and tried to come up with
some quick fix to keep the thing from collapsing again or
bending even more. My solution was less than illustrious,
but it did seem to work.
I
used some scrap wood to make a couple of shims - one shim
to keep the left side from buckling further in that direction,
and another shim to counter the pressure that would be created
on the right side. There really wasn't much I could do about
the splintered wood runners, so some of my storage was lost.
But, I viewed this whole thing as a temporary fix, anyway.
Ultimately, I needed to make a call to Vinotemp to sort
this thing out.
|
|
What
Now?
So,
how's a thing like this happen? Well, I suspect that the
original "S-shaped" stress bend that I noticed
in the rack awhile back (see),
had probably caused some metal fatigue in the aluminum toward
the bottom of the rack, thus ultimately turning the "S"
bend into a "Z" bend. Looking into the warranty
issue on the unit, the Vinotemp limited warranty is 5-yrs
on the compressor, and 12-mos on the cabinetry. Anticipating
that they probably wouldn't cover this problem, I was prepared
to argue the point. However, I'm pleased to say that the
company stood behind their product, calling this as an unfortunate
anomaly. When I questioned the integrity of the rack design,
they replied that although they couldn't say they'd never
seen this happen, there is nothing wrong with the design
itself.
They
offered me a new replacement rack of the same design; I
would only have to pay for shipping. I explained to them
I was still worried about the design - especially the integrity
of the aluminum uprights, and told them I wasn't sure I
wanted to take a chance on this happening again. They said
they obviously couldn't guarantee that it wouldn't happen
again, but said the rack design was sound, and it was very
unlikely. I still wasn't convinced, and expressed a desire
to upgrade to the all-redwood design that I'd wanted initially.
They agreed to do so for a nominal charge. They said they
needed to build the rack, and I should expect a call in
about 7-10 days.
On
the up side, I was getting a nice new all-wood rack. On
the down side, this new racking will cut my storage capacity
about 25% (the redwood's thicker, and the rack doesn't utilize
the inside-wall rails to hold the bottles - which means
that I'd also need to remove all of the side rails before
sliding in the new rack). On the other hand, I thought the
redwood would be more aesthetically pleasing; plus, the
bottle slots are slightly larger, so all of the bigger Pinot
and Syrah bottles will now fit into the slots. So, the only
real question became, what would I do with the 3-4 cases
of wine that won't fit in the cellar? Yes, I know - that
does sound like a good excuse for a party.
|
April
13, 2002 -
New
Rack Installation
|
Vinotemp
had called earlier in the week to say the new rack was ready
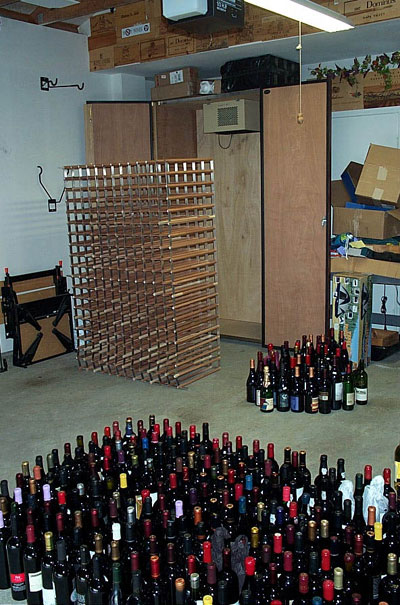
for pickup. First step was to get all of the bottles out
of the rack, and remove the old rack from the cabinet (yep
- deja vu, all over again). My wife and I managed to get
all the bottles out and lined up on the garage floor. Then
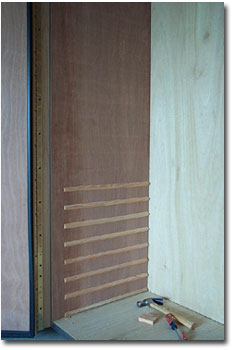
we yanked out the old rack. After that, the bottle supports
on each side wall had to be removed. This proved easier
than I'd thought, because the supports had been stapled
to the sides through the thin mahogany and into the foam
core. Only one support on each side (at the mid-line) gave
me any problems, and that was because the staples probably
went through some adhesive between the wall and the foam
inside the wall.

|
My
fellow wine-road traveller, Michael, had volunteered himself
and his van, so we headed up the 35 miles or so to Rancho
Dominguez to pick up the new rack. On returning, we got
the new rack into the cabinet without a hitch, then proceeded
to load all of the bottles - well, almost all the bottles.
The old racking system had 14x20 bottles slots, for a total
of 560 bottles. The new rack has 10x17 slots, for a 340
bottle total. To that, you can add another 40-50 bottles
on top (probably more, if you're brave), making a total
of 390 bottles. As you can see, the upper reaches of the
cabinet are under-utilized - unless you really stack those
bottles up there. So, one of my future projects is to build
some additional smaller racks to go on each side of the
cooler. They do sell small racks for this purpose, but they're
$80 each.
|
|
Michael
and I had decided to re-inventory all the bottles while
loading the rack. Inventorying is kind of an amusing process
in itself. Amazingly, we found bottles that I'd written
off as lost, when I couldn't them find in previous attempts.
And, there were also a few corrections in order - for instance,
I had the vintage recorded as one thing, but it turned out
to be another (that Michael, trust him to find the
mistakes).
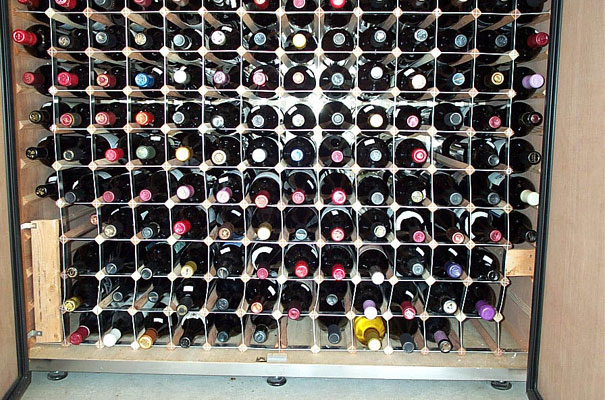
I
was delighted to see that nearly every size of bottle fit
easily into the slots of the new rack - with room to spare!
Gone was the previous problem of worrying about the bottle
thickness - this full-redwood rack has nice large openings.
But, still present was the hassle created by various bottle
heights. As mentioned, many of the newer Cal Cabs are elongated
(thus taller) in shape, making them look very elegant, but
also making them very difficult to place end-to-end in a
conventional rack (the rack is 2-bottles deep). Also, Cal-Itals
like Barbera and Sangiovese have very long necks, and often
exceed the unit's depth if placed end-to-end into the same
bottle slot.
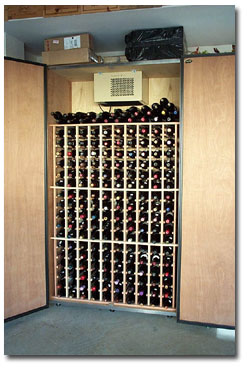
Much
better! The whole thing looks very nice. And, as a little
bonus, I can now get to the 1st column of bottles without
having to take down the bicycles to get the door open wider.
Yes, it has a lot less storage. But, given the sturdiness
and the look of solid wood, I'm real happy the old rack
took a dive. Speaking of which, the Vinotemp factory didn't
want the old unit back. So, right now it's temporarily in
the back yard until I see if some parts are salvagable to
use for additional racking - or until the wife tells me
that either the rack goes, or....
|
 |
| Beginnings
- Back to Part 1 |
|
|
|